> ## Documentation Index
> Fetch the complete documentation index at: https://docs.trieve.ai/llms.txt
> Use this file to discover all available pages before exploring further.
# SiteSearch Content Sites Guide
> Step by step guide on setting up a scrape of any help center, blog, or content site, configuring the web component, and adding the script tag to your site.
## Video Guide
## How to use Trieve SiteSearch for Content Sites
This guide will walk you through setting up Trieve SiteSearch for a blog, help center, or any other content site.
If you are interested in the business context of us developing this product,
you can read more about it in the [introduction section
here](/site-search/introduction#background).
## Steps to set up Trieve SiteSearch for your Content Site
### 1. Navigate to the Crawl Settings for your dataset
Create a new dataset on the first screen of the Trieve dashboard. Once you have created the dataset, click on the dataset name to navigate to the crawl settings using the sidebar.
### 2. Add the Site URL, select "ignore sitemap", and click Start Scraping
Fill out the form as shown below, and click the "Start Scraping" button to begin scraping your site.
### 3. Navigate to the Demo Page for your dataset
Once the scrape is complete, navigate to the demo page for your dataset using the sidebar and click "Publish Dataset" to make the data available for search.
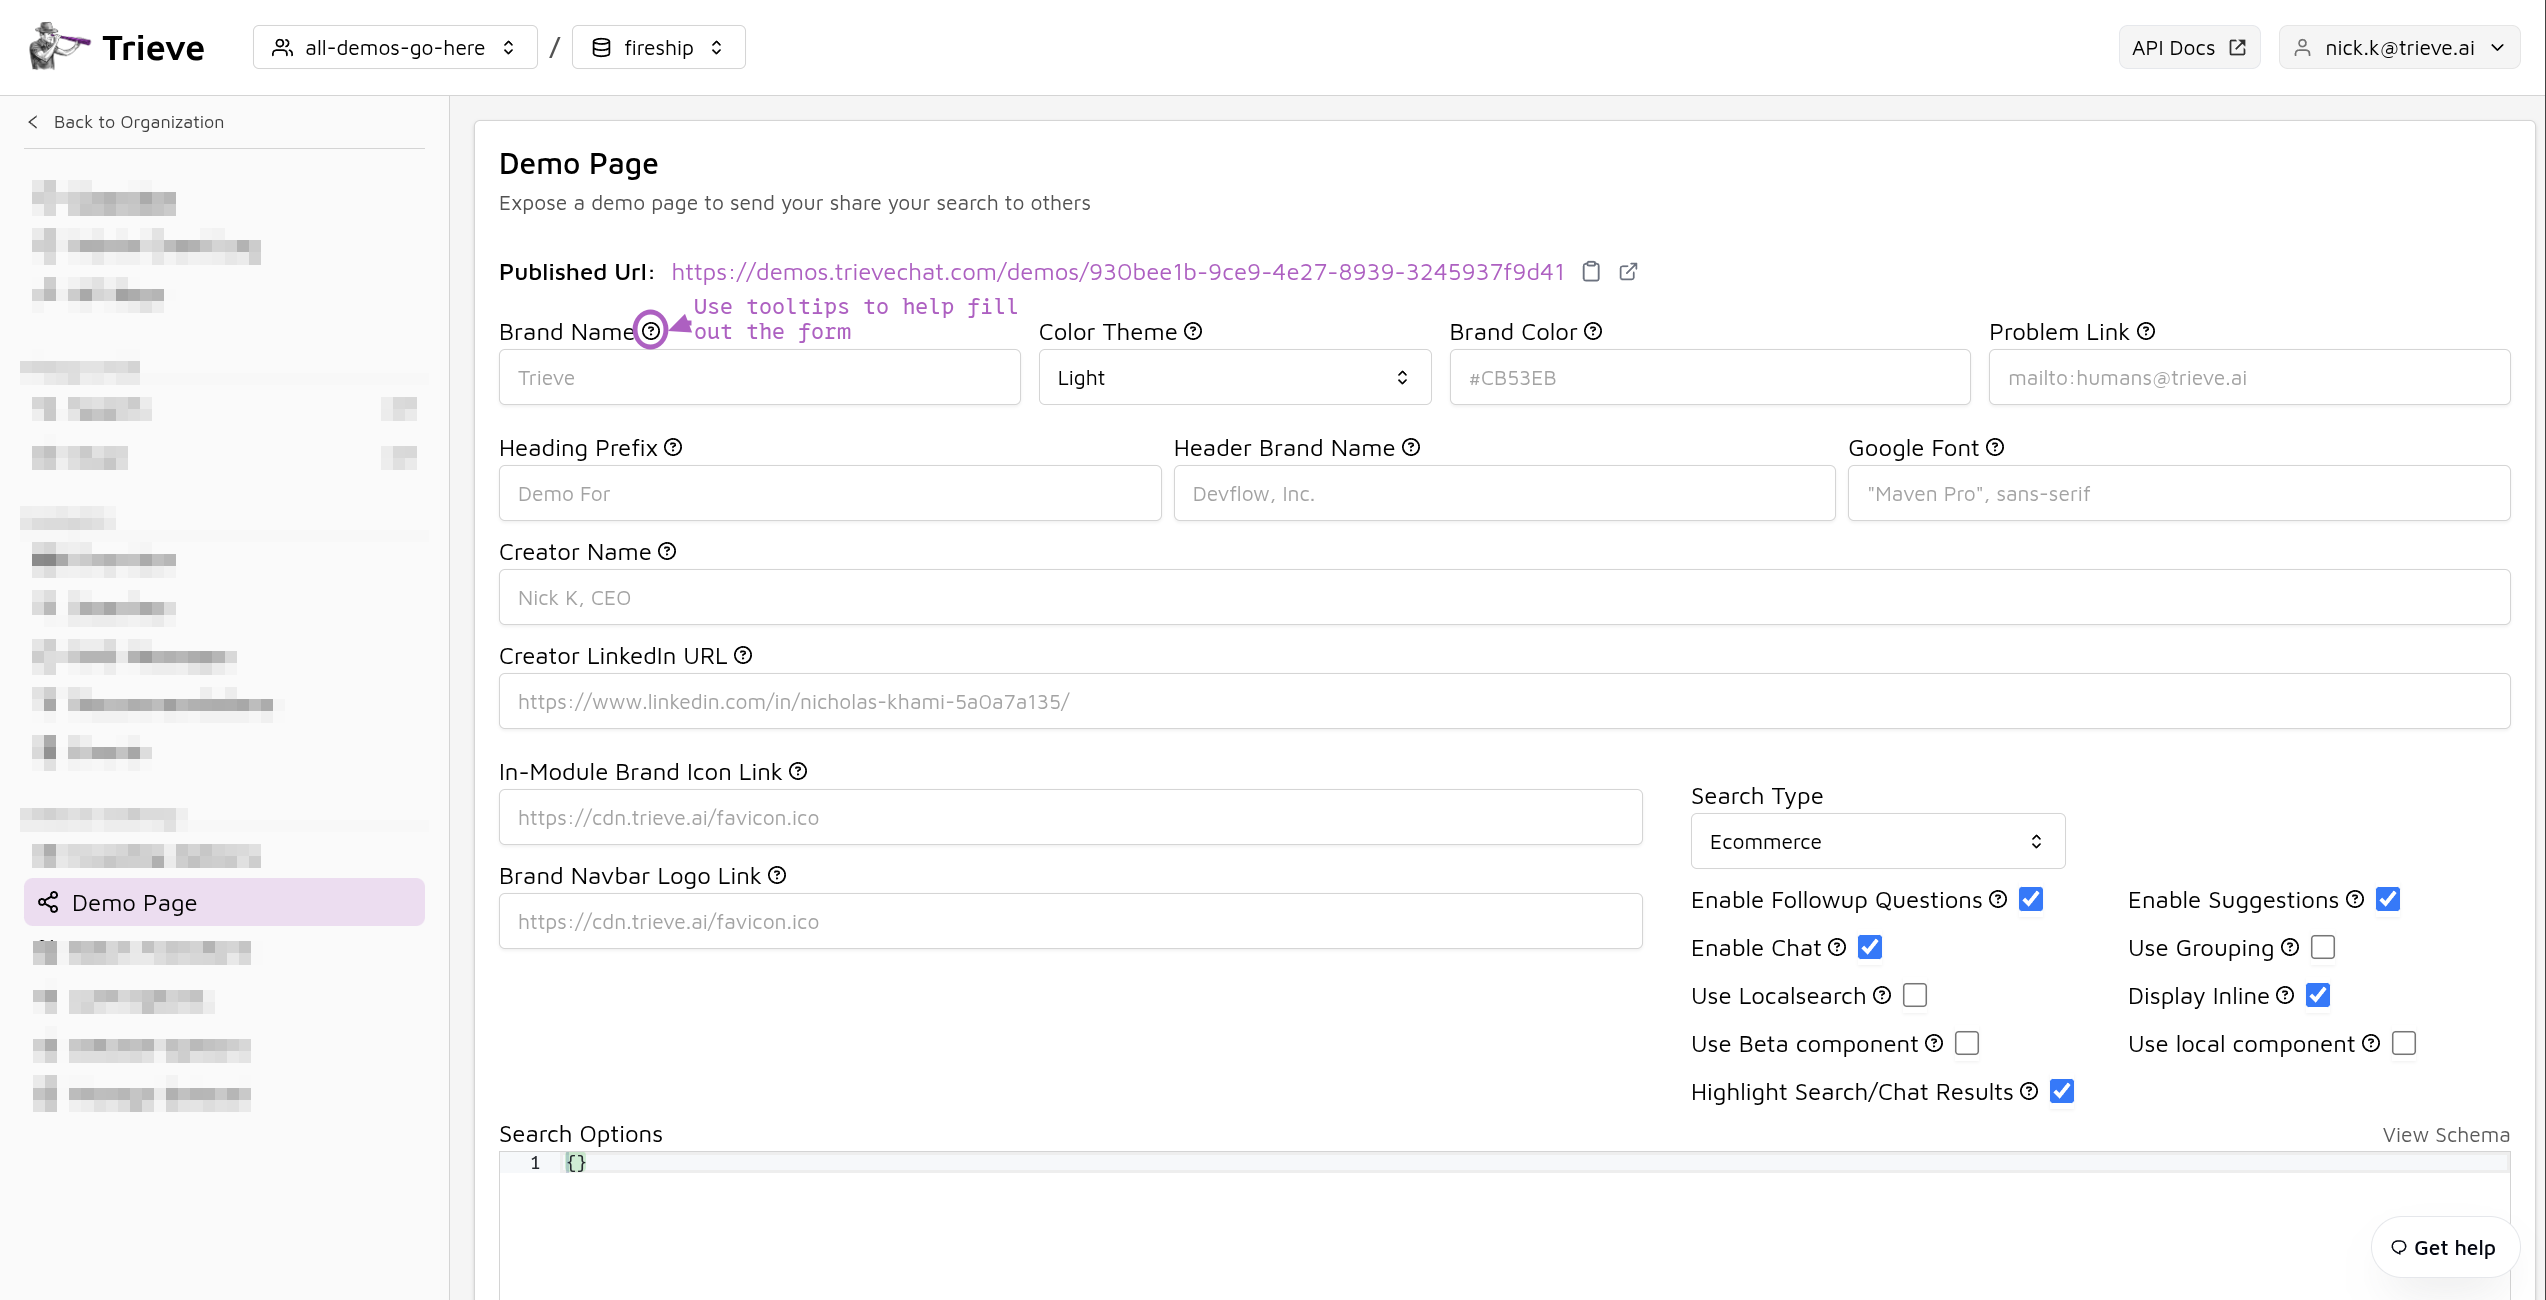
### 4. Configure the Web Component for your site
Fill out the form to customize the appearance of the search component to match your site's branding. Use the tooltips to help you understand the various fields.
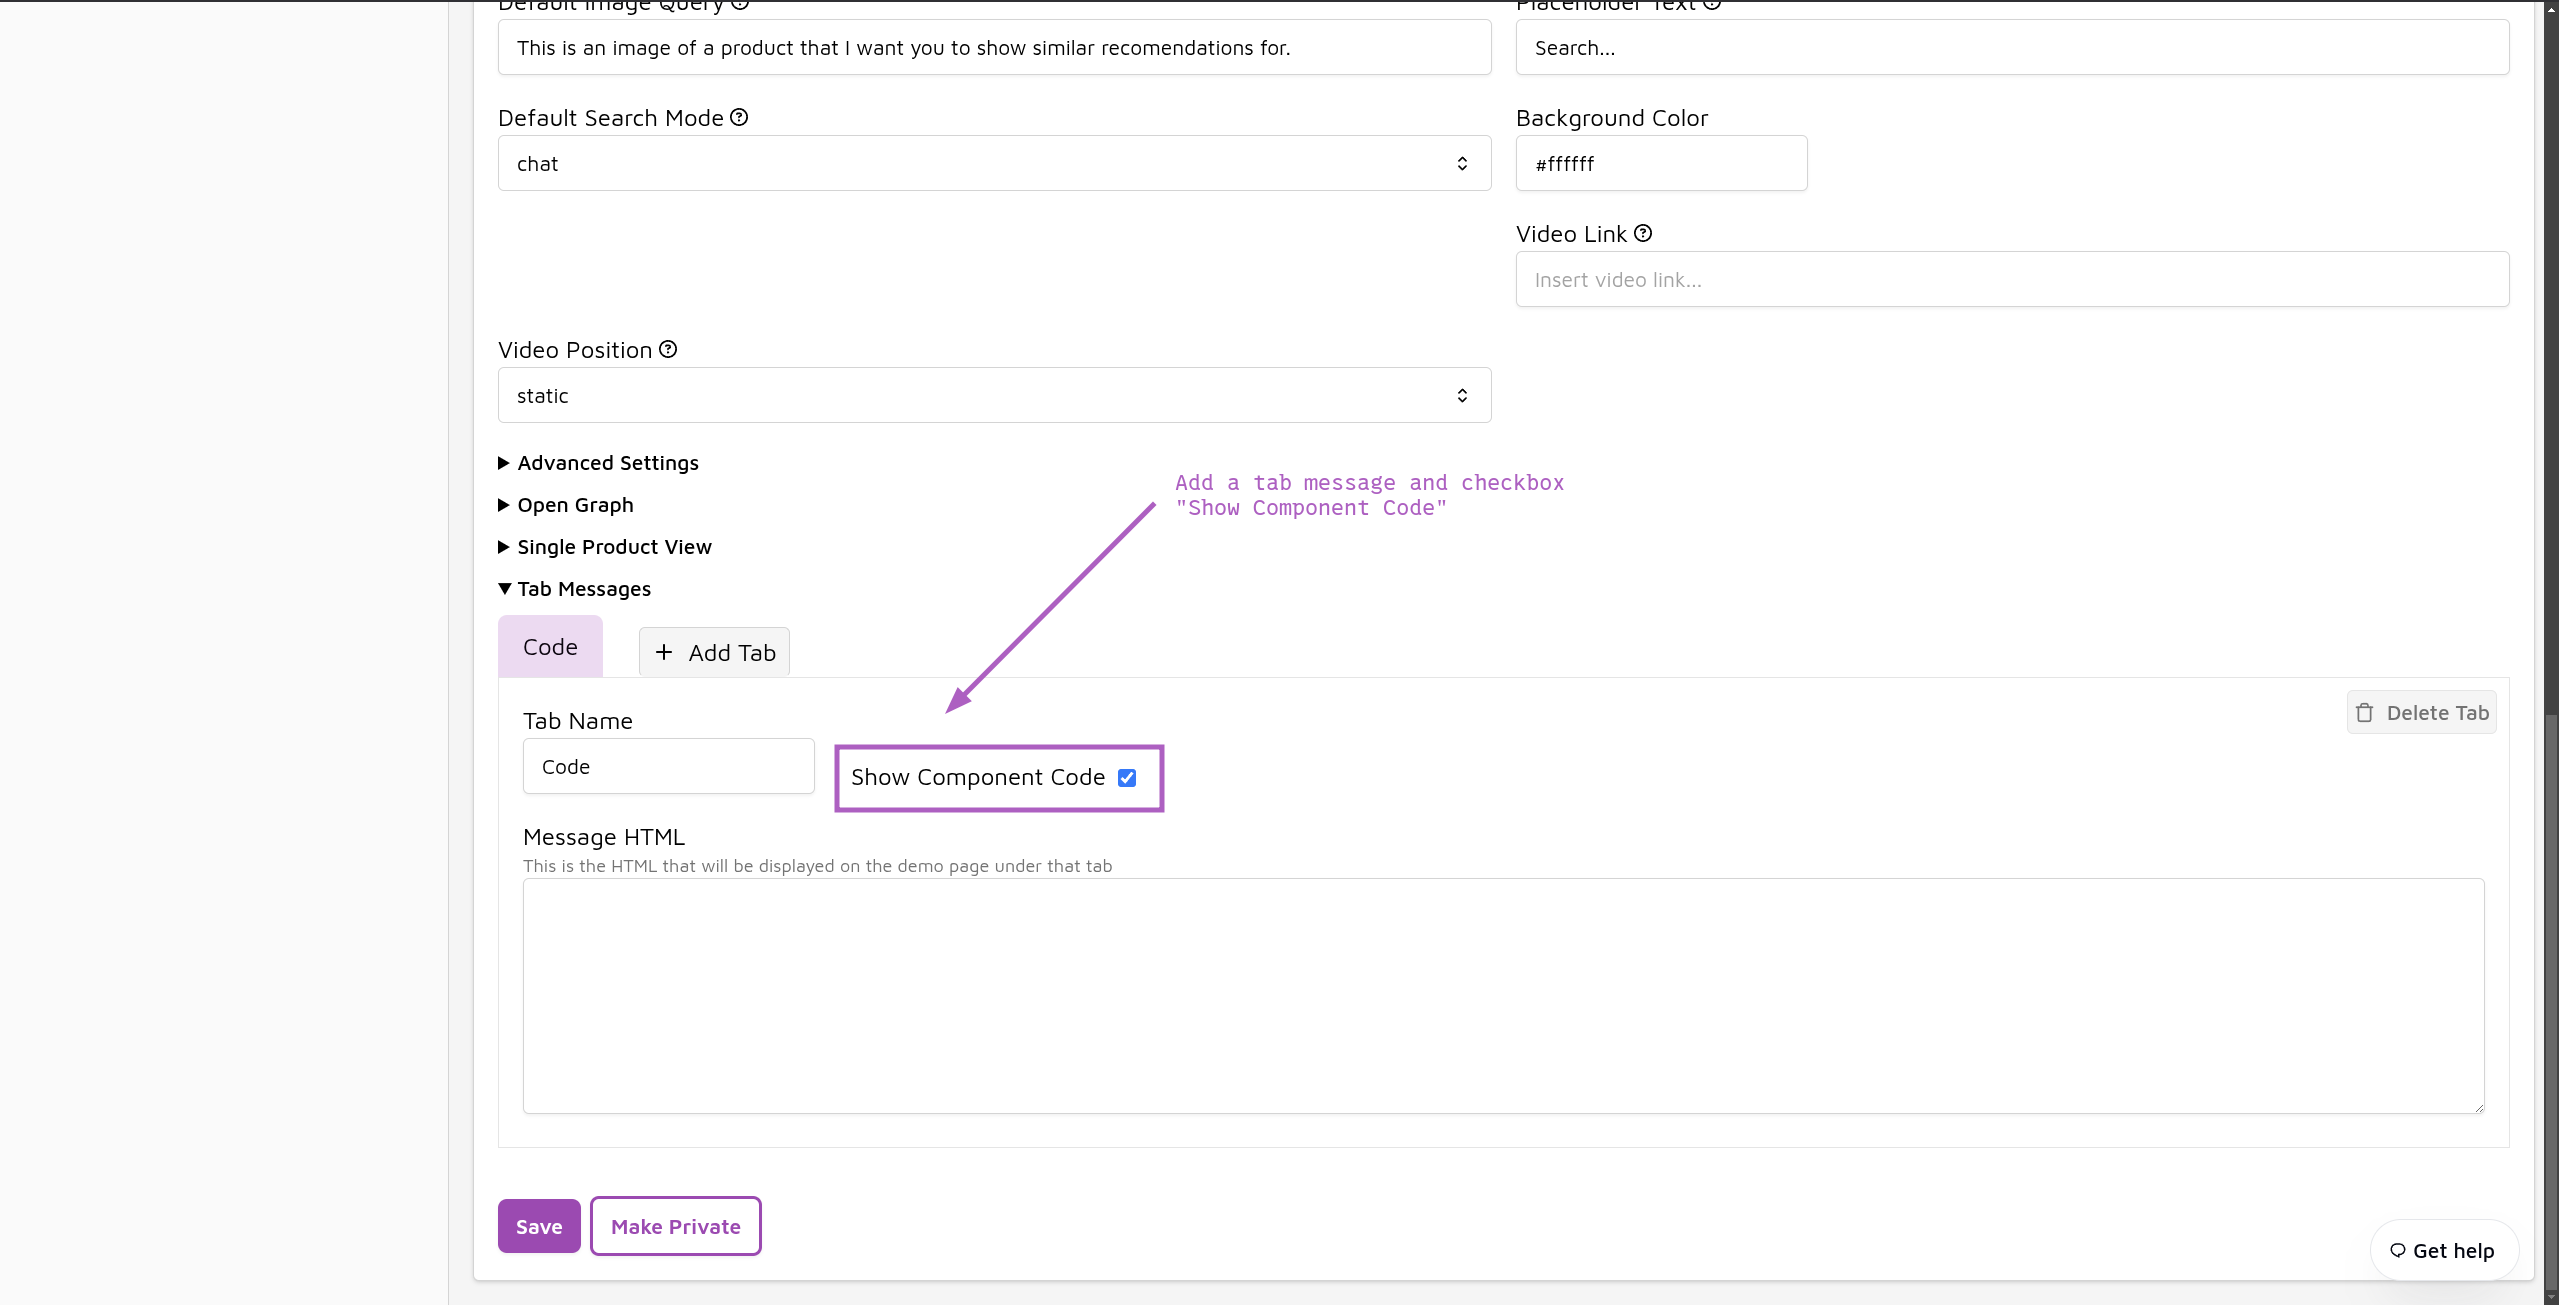
### 5. Add a tab message with code
Once you have configured the search component, scroll to the bottom and go to the "Tab Message" section and add a tag with a code snippet to get the code you will put into the script tag to add the component to your site.
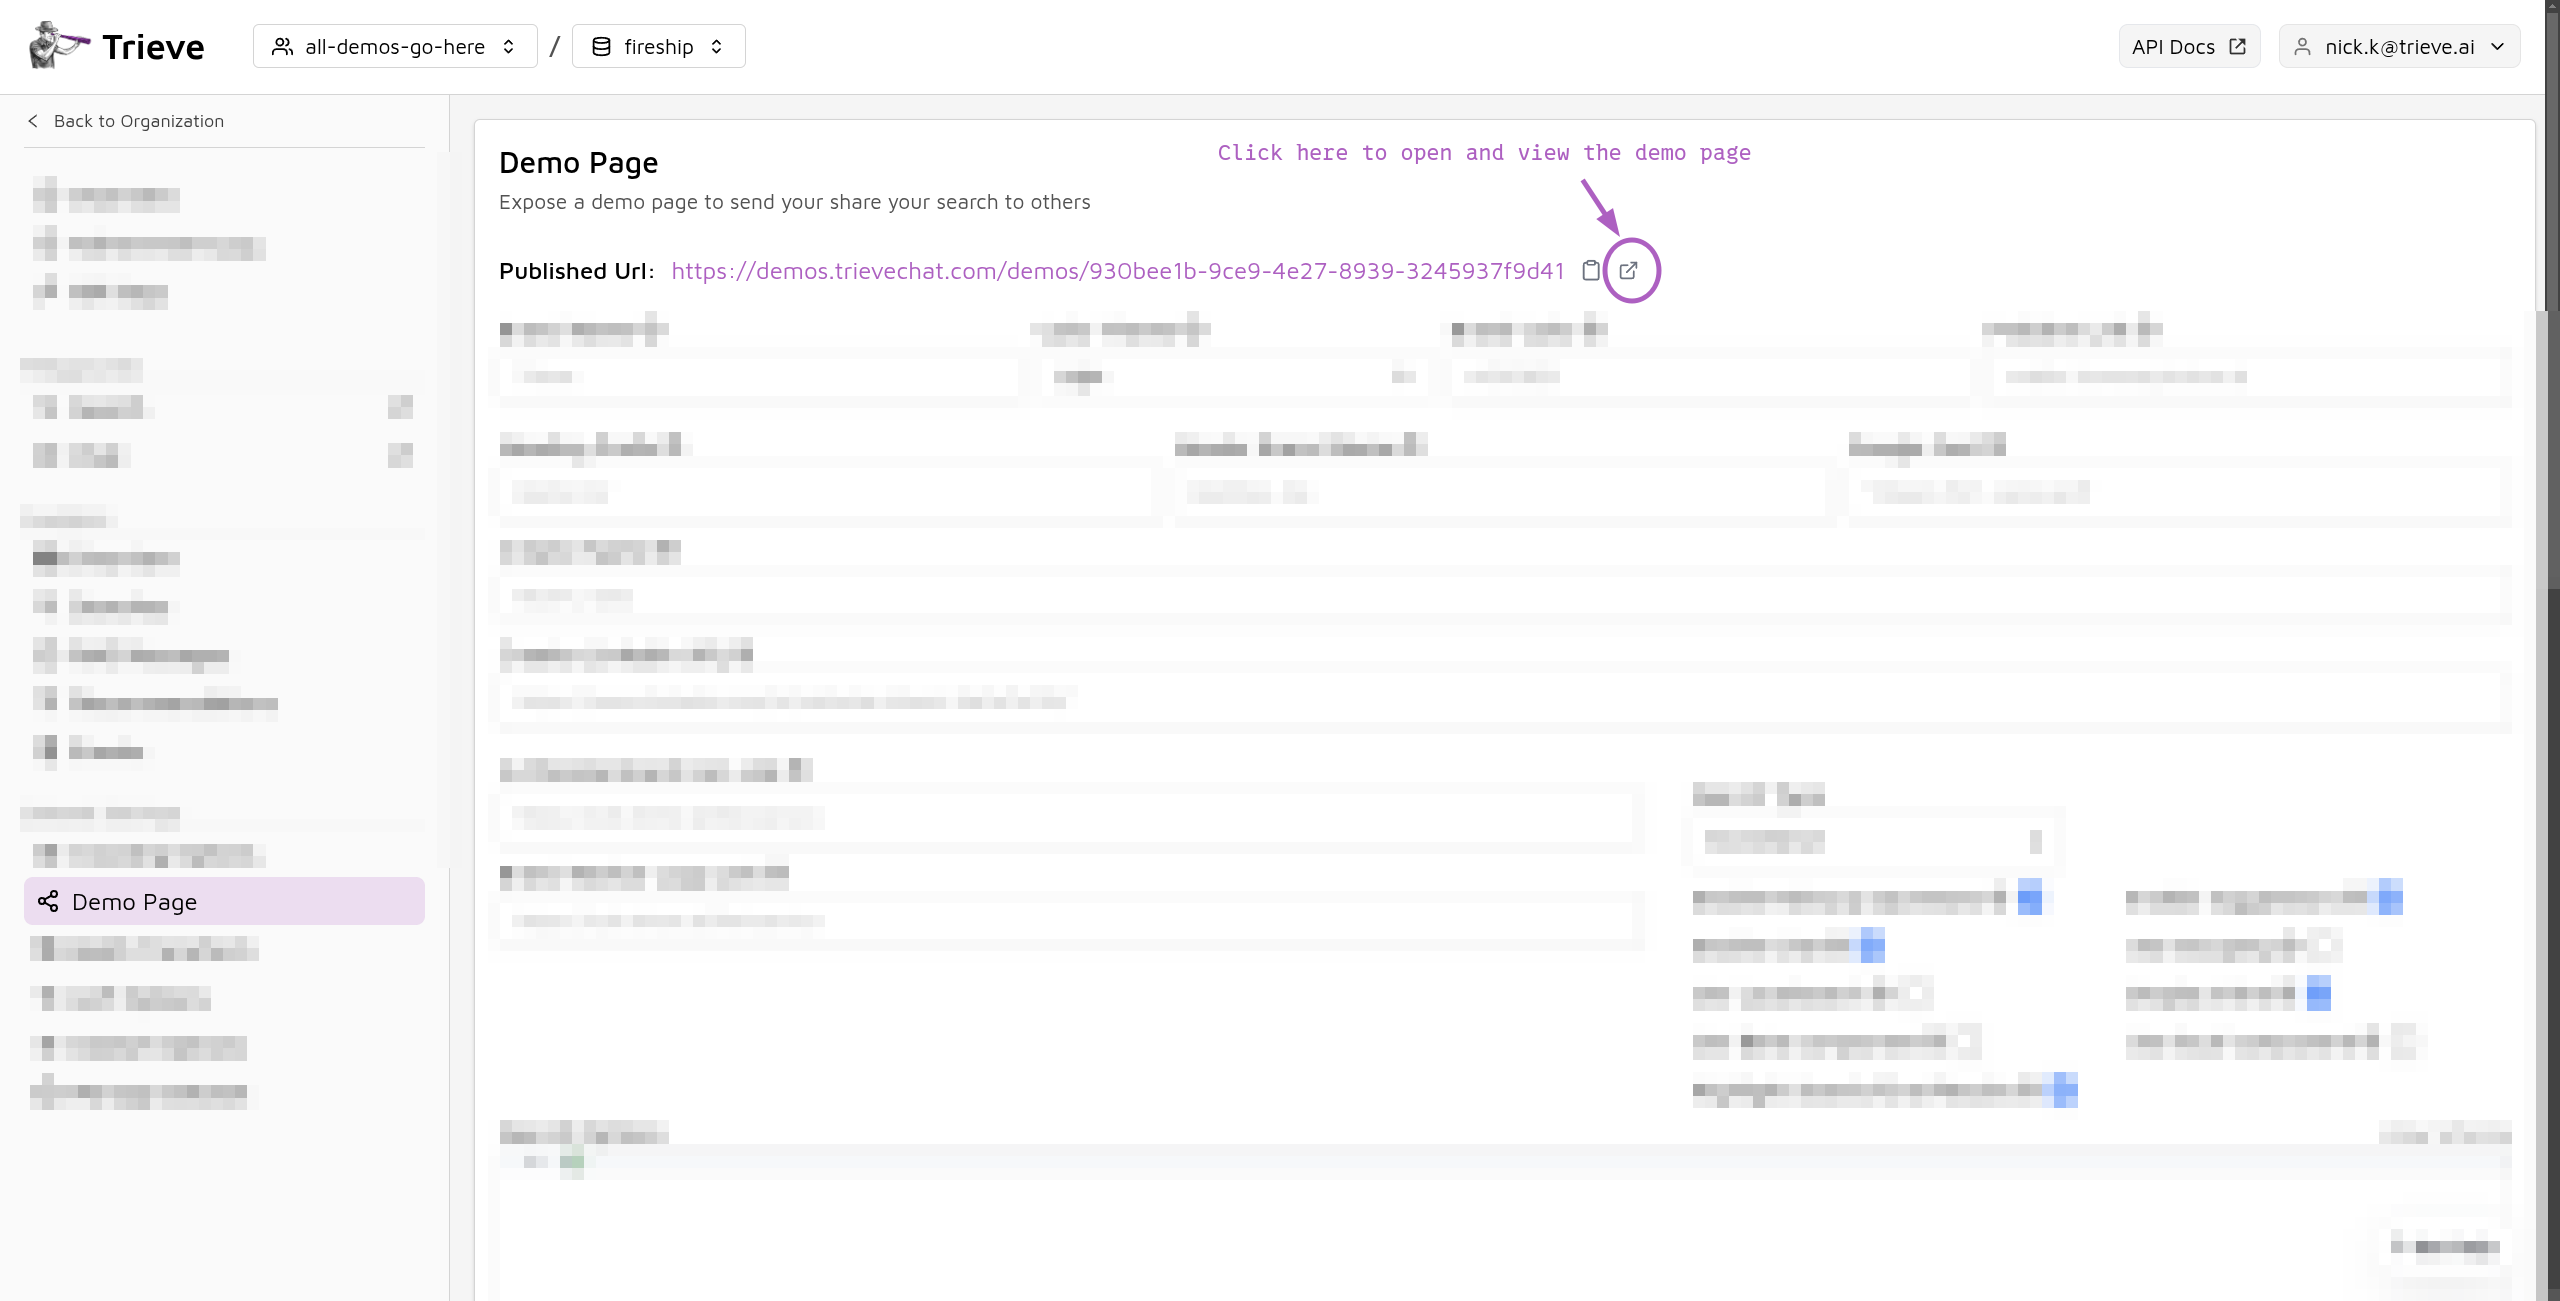
### 6. View your demo page
Scroll back to the top of the page and click the "View Demo Page" button to see the search component in action.
### 7. Find the code block on the demo page
Scroll down to the bottom of the demo page to find the code block and copy its contents.
### 8. Test and add the script tag to your site
Here are some common guides for adding a script tag to common platforms. You may need to consult the documentation for your specific platform.
* [Adding a script tag to a Shopify site](https://www.biscuitsbundles.com/blog/how-to-add-code-to-your-head-section-in-shopify)
* [Adding a script tag to an Elementor site](https://elementor.com/help/custom-code-pro/)
* [Adding a script tag to a WordPress site](https://www.wpbeginner.com/beginners-guide/how-to-easily-add-javascript-in-wordpress-pages-or-posts/)
***
## Optional Testing with tampermonkey
Prerequisites: You need to have the tampermonkey browser extension installed.
See their installation guides on their [website at
tampermonkey.net/#download](https://www.tampermonkey.net/#download).
We like to use the [tampermonkey browswer extension](https://www.tampermonkey.net/) to test the script tag before adding it to our site. Once you have tested the script tag, add it to your site's head tag in your HTML.
That requires doing a bit of a transformation of the code block you copied from the demo page. Here's how we do it:
### 1. Open the demo page and scroll to the code block
Open the demo page for your dataset and scroll to the bottom to find the code block.
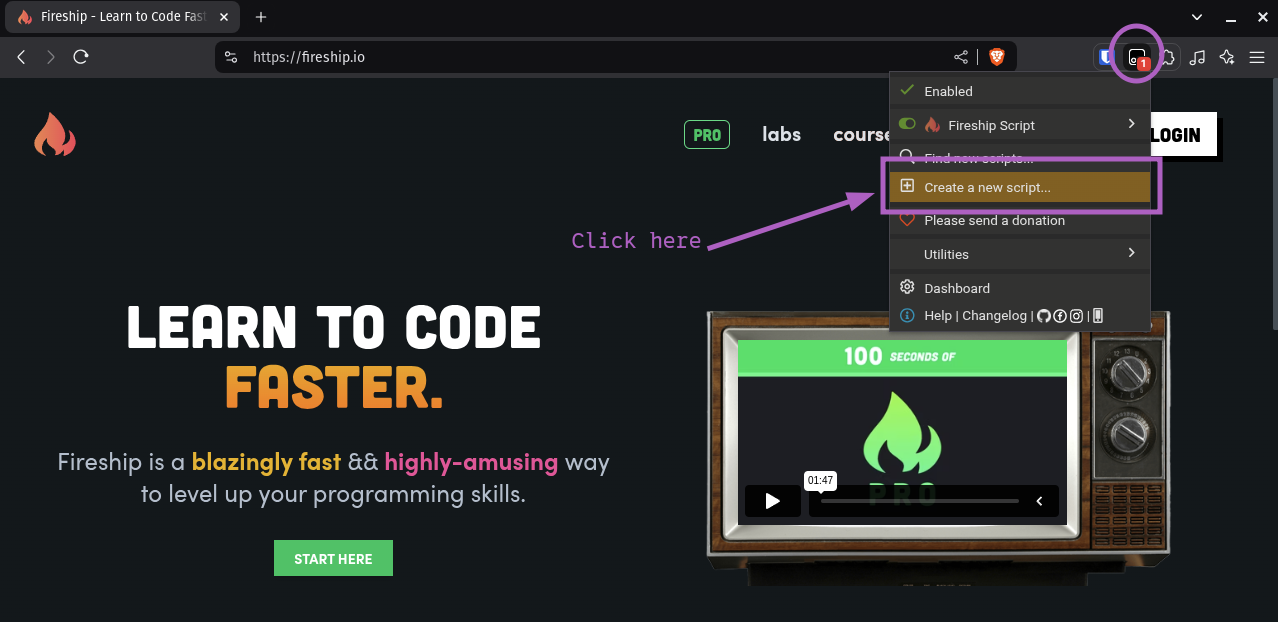
### 3. Navigate to the site you intend to add the component new and create a new tampermonkey script
Once you have copied the code block, navigate to the site you intend to add the component to and create a new tampermonkey script.
### 4. Paste the following code block into the new tampermonkey script
Replace the contents of the new tampermonkey script with the following code block starting below the commented lines at the top.
```javascript tampermonkey script {17} theme={null}
(function () {
"use strict";
const link = document.createElement("link");
link.rel = "stylesheet";
link.href = "https://search-component.trieve.ai/dist/index.css";
document.head.appendChild(link);
import("https://search-component.trieve.ai/dist/vanilla/index.js")
.then((module) => {
const root = document.createElement("div");
root.classList.add("trigger");
document.body.appendChild(root);
module.renderToDiv(root, {
//
});
})
.catch((error) => {
console.error("Failed to load search comonent:", error);
});
})();
```
### 5. Replace the props in the tampermonkey script with the props from the demo page
Navigate back to the demo page and copy the props from the code block. Replace the `` in the tampermonkey script with the props from the demo page.
Your final result should look something like this for the [fireship.io site in example](https://fireship.io/).
```javascript final tampermonkey script {28-39} theme={null}
// ==UserScript==
// @name Fireship Script
// @namespace http://tampermonkey.net/
// @version 2025-02-28
// @description try to take over the world!
// @author You
// @match https://fireship.io/
// @icon https://www.google.com/s2/favicons?sz=64&domain=fireship.io
// @grant none
// ==/UserScript==
(function () {
"use strict";
const link = document.createElement("link");
link.rel = "stylesheet";
link.href = "https://search-component.trieve.ai/dist/index.css";
document.head.appendChild(link);
import("https://search-component.trieve.ai/dist/vanilla/index.js")
.then((module) => {
const root = document.createElement("div");
root.classList.add("trigger");
document.body.appendChild(root);
module.renderToDiv(root, {
apiKey: "tr-ry8EUHNioE2pVKcS37l5u31EGbU5wMk9",
datasetId: "930bee1b-9ce9-4e27-8939-3245937f9d41",
baseUrl: "https://api.trieve.ai",
type: "docs",
analytics: true,
brandLogoImgSrcUrl:
"https://avatars.githubusercontent.com/u/46283609?s=200&v=4",
brandName: "Fireship",
brandColor: "#ff3e00",
placeholder: "Search...",
defaultSearchMode: "chat",
showFloatingButton: "true",
theme: "dark",
});
})
.catch((error) => {
console.error("Failed to load search comonent:", error);
});
})();
```
 ### 2. Add the Site URL, select "ignore sitemap", and click Start Scraping
Fill out the form as shown below, and click the "Start Scraping" button to begin scraping your site.
### 2. Add the Site URL, select "ignore sitemap", and click Start Scraping
Fill out the form as shown below, and click the "Start Scraping" button to begin scraping your site.
 ### 3. Navigate to the Demo Page for your dataset
Once the scrape is complete, navigate to the demo page for your dataset using the sidebar and click "Publish Dataset" to make the data available for search.
### 3. Navigate to the Demo Page for your dataset
Once the scrape is complete, navigate to the demo page for your dataset using the sidebar and click "Publish Dataset" to make the data available for search.
 ### 4. Configure the Web Component for your site
Fill out the form to customize the appearance of the search component to match your site's branding. Use the tooltips to help you understand the various fields.
### 4. Configure the Web Component for your site
Fill out the form to customize the appearance of the search component to match your site's branding. Use the tooltips to help you understand the various fields.
 ### 5. Add a tab message with code
Once you have configured the search component, scroll to the bottom and go to the "Tab Message" section and add a tag with a code snippet to get the code you will put into the script tag to add the component to your site.
### 5. Add a tab message with code
Once you have configured the search component, scroll to the bottom and go to the "Tab Message" section and add a tag with a code snippet to get the code you will put into the script tag to add the component to your site.
 ### 6. View your demo page
Scroll back to the top of the page and click the "View Demo Page" button to see the search component in action.
### 6. View your demo page
Scroll back to the top of the page and click the "View Demo Page" button to see the search component in action.
 ### 7. Find the code block on the demo page
Scroll down to the bottom of the demo page to find the code block and copy its contents.
### 7. Find the code block on the demo page
Scroll down to the bottom of the demo page to find the code block and copy its contents.
 ### 8. Test and add the script tag to your site
Here are some common guides for adding a script tag to common platforms. You may need to consult the documentation for your specific platform.
* [Adding a script tag to a Shopify site](https://www.biscuitsbundles.com/blog/how-to-add-code-to-your-head-section-in-shopify)
* [Adding a script tag to an Elementor site](https://elementor.com/help/custom-code-pro/)
* [Adding a script tag to a WordPress site](https://www.wpbeginner.com/beginners-guide/how-to-easily-add-javascript-in-wordpress-pages-or-posts/)
***
## Optional Testing with tampermonkey
### 8. Test and add the script tag to your site
Here are some common guides for adding a script tag to common platforms. You may need to consult the documentation for your specific platform.
* [Adding a script tag to a Shopify site](https://www.biscuitsbundles.com/blog/how-to-add-code-to-your-head-section-in-shopify)
* [Adding a script tag to an Elementor site](https://elementor.com/help/custom-code-pro/)
* [Adding a script tag to a WordPress site](https://www.wpbeginner.com/beginners-guide/how-to-easily-add-javascript-in-wordpress-pages-or-posts/)
***
## Optional Testing with tampermonkey
 ### 4. Paste the following code block into the new tampermonkey script
Replace the contents of the new tampermonkey script with the following code block starting below the commented lines at the top.
```javascript tampermonkey script {17} theme={null}
(function () {
"use strict";
const link = document.createElement("link");
link.rel = "stylesheet";
link.href = "https://search-component.trieve.ai/dist/index.css";
document.head.appendChild(link);
import("https://search-component.trieve.ai/dist/vanilla/index.js")
.then((module) => {
const root = document.createElement("div");
root.classList.add("trigger");
document.body.appendChild(root);
module.renderToDiv(root, {
//
### 4. Paste the following code block into the new tampermonkey script
Replace the contents of the new tampermonkey script with the following code block starting below the commented lines at the top.
```javascript tampermonkey script {17} theme={null}
(function () {
"use strict";
const link = document.createElement("link");
link.rel = "stylesheet";
link.href = "https://search-component.trieve.ai/dist/index.css";
document.head.appendChild(link);
import("https://search-component.trieve.ai/dist/vanilla/index.js")
.then((module) => {
const root = document.createElement("div");
root.classList.add("trigger");
document.body.appendChild(root);
module.renderToDiv(root, {
//